Showing posts with label project. Show all posts

Sunday, November 24, 2019

What is a 5-E model?

What is a 5-E model?


This model describes a teaching sequence that can be used for complete programs,
specific units and individual lessons. These strategies support the constructivist learning cycle,
which helps students create their own understanding of new experiences and ideas.


The 5-E model is a method for structuring a research-based teaching method is based on a
model developed by the Biological Sciences Curriculum Study (BSCS). This model employs 5Es:
engage, explore, explain, elaborate and evaluate, and is based on a constructivist philosophy of
learning. 


In this learning philosophy, students build or develop their own understanding of new ideas based
on what they already know. Each E represents part of a sequential instruction process or learning
cycle designed to help students build their own learning experiences and the final understanding
of the topic or concept. 

The 5 E model represent the five stages of the teaching and learning sequence: 
  • Engage,
  • Explore, 
  • Explain, 
  • Elaborate
  • and Evaluate. 

ENGAGE 
  • Engage-Achieve student interest and have them personally participate in the lesson,
and at the same time, make an assessment of prior knowledge. 

  • During this stage, students are presented with an educational task. 
  • They make connections between past and present learning experiences, and think about
what they will learn during the next activities. 

  • The 5 E model activities are designed for students to participate through activities and
experiments, plans class stimulate students' curiosity and encourage them to ask their own questions.
  • Teachers:
    • At this stage, teachers present a topic or concept with a question or demonstration
    • fascinating, intriguing and challenging designed to capture student interest, curiosity,
and attention.

    • At this stage, teachers do not seek a "Correct Answer"; Instead, they encourage
students to talk about what they already know about the subject (or think they can know) and
discuss what else students would like to know.


EXPLORE
  • Exploration makes students get involved with the topic so that they can develop their
own understanding.
  • Exploration experiences provide students with activities that help them identify and improve
current concepts (i.e., misconceptions), processes and skills. 
  • Students have practical fun in laboratory activities that help them use their prior knowledge
to generate new ideas, explore questions and possibilities, as well as design and conduct preliminary
research. 
  • The teacher acts as a moderator, delivering materials and guiding the students.
  • Teachers:
    • During the exploration, students perform various activities to solve problems or
practices and experiments designed to help them explore the topic and make connections to
concepts related, often within groups or teams. 
    • During this stage, students share experiences common, while the teacher acts as a
facilitator, providing materials as needed and guiding the students' approach.


EXPLAIN
  • This stage provides students with the opportunity to communicate what they have learned
and understand what it means. 
  • At this stage, students begin to communicate what they have learned by demonstrating their
understanding of conceptual, process skills or behaviors. 
  • Students share ideas with each other and with their teacher, who provides an explanation of
the curriculum that is made to guide them towards a deeper understanding. 
  • These segments present vocabulary in context and correct or redirect the wrong concepts.
  • Teachers:
    • At this stage, teachers help students observe patterns, analyze results, and/or draw
conclusions based on their activities and research. 
    • Teachers also define vocabulary that is relevant.

ELABORATE
  • This stage allows students to use their new knowledge and continue to develop a deeper
and broader understanding.
  • During the elaboration, the students expand the concepts they have learned, make
connections with other related concepts and apply their knowledge to the world around them
through additional activities. 
  • Teachers:
    • Teachers challenge and expand knowledge and students' conceptual skills.
    • At this stage, the teachers help students make connections based on the concepts
or ideas they have learned previously with other related concepts and new situations.


EVALUATION *
  • Evaluate how much learning has been achieved. 
  • The evaluation phase helps students and teachers assess how much learning and
understanding has been achieved. It allows teachers to evaluate progress
  • Students with respect to the achievement of educational objectives.
  • Evaluation and assessment can occur at any time during the educational process.
  • Teachers:
    • In the final stage, teachers evaluate or value the students' understanding of the
subject studied. 
    • This assessment can be formal or informal, but it must demonstrate a clear
understanding of what students have learned throughout the lesson.


Sunday, January 14, 2018

Martin Luther King Jr with Prek students

What would happen if we ask about segregation in a Prek classroom?

Social experiment in our PreK classroom: How to learn about MLK and segregation. 

Experimento social en la clase de Infantil Prek: Como aprendemos sobre Martin Luther King y la segregación social.

En este video podrás encontrar sus respuestas y otras actividades.

Please, try to see the world through the eyes of a child!

¡Por favor, intenta ver el mundo a través de la mirada de un niño!

Tuesday, April 4, 2017

MI COMIC - Bilingual PreK - Home Extension Activity

MI COMIC


Nuestro proyecto de "Cómic designer" en el salón #8 de Ninfa Laurenzo ECC (Houston, TX) va avanzando muchísimo. Ya hicieron sus cómics con imágenes, fotografias y otros recursos... siguieron los pasos de mi entrada "Cómic con herramientas básicas"  con unos resultados increíbles, 
!Felicidades, mis campeones y campeonas! 

Pues ahora les ha llegado el momento de desarrollar su propia creatividad y dar rienda suelta a su imaginación, tal cual fueran un creador/a de cómics.

Para seguir hablando de lo que vamos a hacer, un cómic, mejor tenemos una breve definición para saber de que se trata: El cómic es una novela gráfica que narra una historia mediante imágenes y texto, y que necesita de otros elementos para completar y complementar la historia.


En el salón ya hemos visto qué es lo que se hace en esta profesión, de hecho, fue una de nuestras primeras preguntas. Vimos un video sobre esta profesión, que comparto también con ustedes, para entenderla un poco más:


En este otro video podemos ver un explicación muy breve y sencilla sobre las historietas o cómics, sus partes y cómo hacerlos:


Antes de proceder a la explicación de los pasos a seguir, me gustaría que hicieran un "diario", preferiblemente que fuera por escrito, me explico, que ustedes (papás y mamás) escribieran todo lo que hacen, por ejemplo en la manera en que han llegado a pensar en la historia, que expliquen y definan sus personajes, cuál va a ser la acción,... También sería recomendable que les hicieran fotos y/o videos que recojan su proceso en el trabajo, sus experiencias, todo lo posible.

Una vez hecha esta pequena aclaración les voy a recomendar estos pasos para realizar esta actividad:

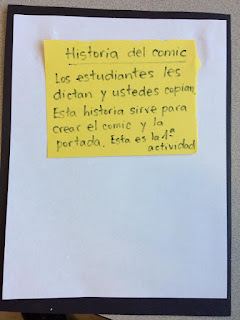
Paso 1: La historia y el dictado.


Aquí nos dictan la historia que nos quieren contar, es decir, mientras nos cuentan la historia nosotros copiamos su mensaje. Esta historia nos servirá para crear la portada y el título del cómic, sin embargo, irá en la última página de nuestro proyecto con las familias.


En la historia podemos ver los personajes, las acciones y los lugares que aparecen en las vinetas del cómic, en otras palabras, formarán las escenas principales de las historias. Además, en las burbujas o globos - y en los recuadros también - podremos leer lo que nos dicen sus personajes, así como otra información de interés. Es importante que hagamos un esquema de los puntos principales de la historia.


En esta parte, si lo desean, pueden realizar una grabación de audio o de video donde se pueda escuchar o ver como realizan esta actividad. Recuerden, la historia debe ser creada por ellos/as, les puedo confirmar desde ya que tienen imaginación y creatividad suficiente como para crear sus propias historias. En el salón de clase lo llevan haciendo desde octubre.

Aquí os dejo una plantilla, como ejemplo, de organización del esquema:

Paso 2: La portada y el título.


Una vez hayan puesto fin a la historia, es necesario crear un título y una portada.

La portada irá en la primera página. En ella podremos leer el título con letras GIGANTES y con mucho colorido, además podremos ver el dibujo de su personaje principal o algún hecho importante de la historia. Para nuestros PreK campeones, hemos de decirles que hagan los dibujos grandes, al menos a mis campeones, he de darles esta instrucción cada vez que hacemos una portada ya que, como de costumbre, suelen hacer los dibujos mas pequenos.

Para la portada, los padres/madres/familiares haremos un gran rectángulo. Este rectángulo puede bordear el folio a 1 cm aproximadamente de su borde.
Ejemplo:


Y dentro del rectángulo hacemos el título y nuestro dibujo de la portada.

En este video podéis ver los pasos de como hacer las letras de los cómics. Es muy sencillo, primero escriben con lápiz y luego bordean a una pequeña distancia de lo escrito con el lápiz. Después pueden dar color y aplicar otras formas y colores en su línea exterior para su decoración.


Paso 3: Las viñetas


Las viñetas son los recuadros que van a contener la historia en imágenes, personajes, lugares, burbujas o globos,... En estas diapositivas podran serle útil para usted, ya que tiene toda la información sobre sus elementos y cómo hacerlas.


Las viñetas ya las hemos estudiado en clase, así que no será muy difícil para ellos hacer sus viñetas. Papá/mamá/familias, por favor, echen un vistazo a todos los elementos que tiene una viñeta, y así les podrán ayudar y guiar en todo este proceso.


Puntos importantes en este paso:

- Sería recomendable que antes de elegir cuántas viñetas van a crear para el cómic, lean de nuevo la historia e identifiquen las escenas que se van a querer representar, normalmente son las más importantes, las que nos cuentan la historia paso a paso.

- Una vez identificadas las escenas, contaremos cada escena y le asignaremos un cuadrado para la viñeta, es decir, si identifican 12 escenas se correspondería a 12 recuadros, si fueran 8 escenas se corresponderían a 8 recuadros.

Los recuadros de las viñetas, sería recomendable, que les ayudara usted, sobre todo por el asunto de la distribucion en las páginas y su tamaño, ya que unas escenas tendrán más contenidos que otras.

Algunos ejemplos o plantillas de organización de viñetas:


Palabras clave y su definición:


- Cuadro o Viñeta - Es un cuadro delimitado por líneas negras que representa un instante de la historieta. Las viñetas se leen normalmentede izquierda a derecha y de arriba abajo para representar un orden en la historia.


- Dibujo - Representa el ambiente donde sedesarrolla la historia (escenario) así comoa los personajes. Van dentro de la viñeta.

- Globos - Espacio donde se colocan los textos que piensa o dicen los personajes. Constan de dos partes: la superior que se denomina globo y el rabillo o delta que señala al personaje que está pensando o hablando.
La forma del globo va a dar al texto diferentes sentidos:
      1.- El contorno en forma de nubes significa palabras pensadas por el personaje.
      2.- El contorno delineado con tornas temblorosas, significa voz temblorosa y expresa debilidad, temor, frío, etc.
      3.- El contorno en forma de dientes de serrucho, expresa un grito, irritación, estallido, etc.
      4.- El contorno con líneas discontinuas indica que los personajes hablan en voz baja para expresar secretos, confidencias, etc.
      5.- Cuando el rabilo del bocadillo señala unlugar fuera del cuadro, indica que el personaje que habla no aparece en la viñeta.
  6.- El globo incluido enotro globo indica laspausas que realiza el personaje en suconversación.
      7.- Una sucesión deglobos que envuelven alos personajes expresapelea, actos agresivos.
      8.- El globo con variosrabillos indica que eltexto es dicho porvarios personales.

- Texto - Forma gráfica que está presente en una página. Si la situación a contar lo requiere, la tipografía se endurece, o se agranda, se hace minúscula porque se está hablando despacio, o se desgarra porque el mensaje es sangriento. Puede haber un tipo de letra para cada personaje, o puede hablar con el sonido del mismo. Dentro del texto escrito hay un elemento que es propio y característico del género.

- Onomatopeya - Elemento gráfico propio y característico de la historieta, este elemento imprescindible se ubica dentro del texto apoyando la direccionalidad que enfatiza la narración. Palabras como Bang, Boom, Plash, etc. cuya finalidad es poner de manifiesto algún sonido no verbal, pero que se expresa por medio de una verbalización de dicho ruido mediante una especie de transcripción fonética del mismo. Aparecen indicadas en la superficie de la viñeta.


Mi Pinterest sobre Cómics


Webs de referencia para ampliar información sobre el cómic y su creación en Educación Infantil y Primaria:

  • http://natystg.blogspot.mx/2007/05/elementos-de-la-historieta.html
  • http://es.wikihow.com/escribir-un-c%C3%B3mic
  • http://es.wikihow.com/hacer-un-comic
  • http://es.wikihow.com/crear-una-historieta
  • http://www.materialesdelengua.org/LITERATURA/TEXTOS_LITERARIOS/COMIC/pagina5.htm
  • http://www.bandaseducativas.com/como-se-hace-una-historieta/


Licencia de Creative Commons

Wednesday, March 29, 2017

Finding Donors...

PreK Augmented Reality

My students need to live new ways of learning with innovation and technology. My students need a Learning alivetm Plus Suite (PC/MAC).

Today I've started a new fundraising with Donorschoose.org: Please, donors, you can double your donations up to $50 by adding the promo code LIFTOFF at checkout for the next 7 days. (up to April 5th, 2017 we can reach the project with the half of the total price)


My Students

Technology and digital learning are key elements for 21st Century students. It is also very important for them to learn how to use the technology with responsibility and with a real purpose.
These devices will make a difference in helping my students learn because it will provide them with easier access to learn as home extension activities.
They can practice reading, writing and counting at home with their parents. Parent involvement in their children's early exposure to learning is an integral component of success in future grades. Your generous donation to our project will improve our Pre-K program. This will impact not only our students but their families as well because parents have another opportunity to bond with their children through a shared love of learning and other educative activities. Our students enjoy attending our school and we strive to help them feel empowered at an early age. Educative technology and a shared love of learning open many doors to discovery and success!

My Project

Augmented Reality is a new technology tool that enriches reality with other experiences. In addition, the use of A.R. can help our students develop their motivation for learning since it encourages their exploring skills. Using technology in classroom also helps them develop their 21st Century skills and they learn how to use technology in a responsible way.

This is one of the best tech-tools that a 21st century classroom and students can have.
Augmented Reality is innovation in classroom since it implies movement when learning. This technology pushes them to learn and discover new things in the classroom, so they can feel motivated and families can be happy.
This video will show you one example of what A.R. can do:

This is one article where you can read about Augmented Reality in Education- 
7 Creative Ways to Improve Student Engagement: Augrealitypedia

More information about Augmented Reality and Education (wikipedia)


App iWow,[114] a mobile device-based augmented reality enhanced world globe. 

In educational settings, AR has been used to complement a standard curriculum. Text, graphics, video and audio were superimposed into a student’s real time environment. Textbooks, flashcards and other educational reading material contained embedded “markers” or triggers that, when scanned by an AR device, produced supplementary information to the student rendered in a multimedia format.[115][116][117]


As AR evolved students could participate interactively. Computer generated simulations of historical events, exploring and learning details of each significant area of the event site could come alive.[118] On higher education, there are some applications that can be used. Construct3D, a Studierstube system, allowed students to learn mechanical engineering concepts, math or geometry.[119] Chemistry AR apps allowed students to visualize and interact with the spatial structure of a molecule using a marker object held in a hand.[120] Anatomy students could visualize different systems of the human body in three dimensions.[121]

Augmented reality technology enhanced remote collaboration, allowing students and instructors in different locales to interact by sharing a common virtual learning environment populated by virtual objects and learning materials.[122]

Primary school children learn easily from interactive experiences. For instance, astronomical constellations and the movements of objects in the solar system were orient in 3D and overlaid in the direction the device was held and expanded with supplemental video information. Paper-based science book illustrations could seem to come alive as video without requiring the child to navigate to web-based materials.

While some educational apps are available for AR in 2016, it is not broadly used. Apps that leverage augmented reality to aid learning, included SkyView for studying astronomy,[123] and AR Circuits for building simple electric circuits.[124]


Sunday, March 26, 2017

Global project: JAPAN and ORIGAMI (Early Childhood Education)

Mr. Usero / Japan EXPO

Project-Based learning offers many possibilities and opportunities of learning in a meaningful way, since it is based on real questions and connections have to be created to answer them. In addition, this projects can be connected to other countries or other realities far from the closest one, enriching our perspective of the world and promoting respect to other cultures. Briefly, this kind of projects can build bridges to other cultures, or at least, open windows to them.

This post shows you our global project about Japan, an amazing country. Adapted to the Pre-K level, we worked lots of activities and we learned a lot. The following  links will offer you all the information and samples of those activities.

This link, as part of our PD training with VIFlearning, is focused on origami. Being focused on the international education, the students will be familiar with Japan, in which they will be able to identify Japan in a map, know about Japan and its geography (volcano, islands,...), and the students will do origami.


We took into account the activate prior knowledge that was the use of paper. Usually, they use paper to write, draw and paint, but there are other uses: origami (3D shapes)


They wanted to know about origami, so we facilitated them materials and resources to investigate about origami and analyze it. After reading a book about origami and watching a short video about it, they have a paper in front of them to be shaped as origami.


Standards Alignment

Literacy PK Guideline: 

*III.D.2. Uses information learned from books by describing, relating, categorizing, or comparing and contrasting. 
*III.D.3. Asks and answers appropriate questions about the book. Highly Effective Objective: I will gain an understanding of the Japanese culture through reading various informational books. 
Social Studies PK Guidelines: 
VII.A.1. Child identifies similarities and differences in characteristics of people. 
Highly Effective Objective: I will use photographs and pictures to illustrate and elicit ideas about how people are alike and different to develop an appreciation for people from a different culture.


My Reflection

By knowing and getting closer to other cultures and by experiencing by themselves they can learn better and respect them besides of being awared of other cultural expressions that are different from their own ones.

The use of ICT is important in this case, because they can see children like them doing similar things and different ones in other cultures and they can learn how to do things from other point of view. Apart from that, ICT and Internet can be very useful to share their work and their learning.

Web/Print Resources

  • CULTURA, CURIOSIDADES Y BLOGS 
Kirainet. Un geek en Japón -  http://www.kirainet.com/
Descubrir Japón - http://descubrirjapon.com/esp/index.php Suteki...
Pedacitos de Japón - http://suteki.es/
Un español en Japón - http://flapyinjapan.com/ 
Una japonesa en Japón - http://unajaponesaenjapon.com/
Pepinismo - http://www.pepinismo.net/
Tofugu - http://www.tofugu.com/

  • VIAJAR A JAPÓN Y TURISMO 

Surviving in Japan - http://www.survivingnjapan.com/
Japan Travel Guide - http://www.japan-guide.com/e/e623.html 
Japan Travel Info - http://www.japantravelinfo.com/top/index.php
Viaje a Japón - http://www.viajeajapon.com/ 
Oficina Nacional del Turismo Japonés - http://www.turismo-japon.es/
Embajada de Japón - http://www.es.emb-japan.go.jp/

  • ORIGAMI